Have you noticed extra moisture or humidity in the air? It may be due to poor ventilation. So, here’s a guide on how to clean your Panasonic bathroom fan in a few easy steps.
The little fan in the ceiling does more work than you think. A well-ventilated bathroom is less harmful.
If there is humidity and extra moisture, it will cause mold and mildew. Poor ventilation also causes unpleasant odor since most bathrooms are in rooms.
This means that the exhaust fan is dirty and clogged. In addition, the exhaust fan makes noise when it is dirty.
Therefore, it is a sign for you to clean your bathroom exhaust fan. A clean exhaust fan works better and exhausts more air.
On the other hand, a dirty exhaust fan may cause a fire hazard due to build-up dust. In addition, a blocked motor will result in overheating and may cause a fire.
At a Glance – How to Clean Panasonic Fan?
- Before thinking about cleaning the Panasonic Fan, switch it off from its power circuit breaker.
- Gently pull its cover to remove it.
- Wash this cover with soapy water.
- Loose the screws of the fan and pull it down with your hands.
- Now clean the squirrel cage, air compressor, and all other fan parts with a softer brush.
- Unplug the motor from its ceiling and remove it from its holdings.
- Scrub this motor with soapy water and clean it with its mesh cover.
- Use a vacuum cleaner or air compressor to clean its fan box.
- Finally, reassemble the fan and adjust it back to its original place.
Things Required to Clean Panasonic Bathroom Fan
Tools
- Screwdriver
- Soft bristle brush
- Vacuum cleaner (with brush attachment)
- Compressed air can (optional)
Materials
- Microfiber cloth
- Mild soap
8 Steps to Clean Panasonic Bathroom Fan
Follow these steps to clean your Panasonic bathroom fan in a quick way:
Step 1. Switch Off the Fan
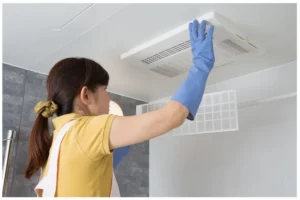
Firstly, switch off the fan before cleaning; you can wear rubber gloves as well. You can also switch off the power circuit breaker for extra safety.
Step 2. Remove the Cover
Now, grab the cover and pull gently. Check for the two metal clips or wires behind the cover and pinch them together to remove the cover completely. To remove the fan cover, you need to go through some procedures
- Make sure you keep the ladder on a flat and dry surface. The ladder should have a firm grip to reduce movement.
- Be careful with the cover; do not pull too hard otherwise, you will break the cover. There are four metal wires or clips behind the cover.
- You have to squeeze these clips by hand carefully. It will get them out.
- Apply the same rule for pulling out the other.
- After removing clips, remove the fan cover carefully; if you have a light bulb installed, detach the wire first, then pull the cover gently. And keep it in a safe place.
Step 3. Wash the Cover
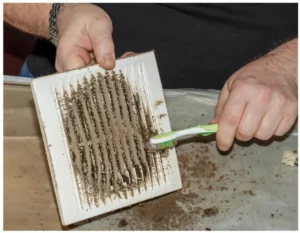
To clean the bathroom fan cover, put some mild soap in water and gently scrub the cover with a soft bristle brush or toothbrush works just as fine.
On the other hand, the fan cover with light uses a damp microfiber cloth to clean. After cleaning, put the cover on a dry towel or rack.
Step 4. Remove the Fan
After cleaning the cover, go to the main part. To unplug the fan, follow these steps
- Safety first, switch off the fan or, for more safety, pull up the circuit breaker for the bathroom fan.
- There are a few screws on different sides. Loosen the screws gently with a screwdriver.
- Pull the fan down gently; remember to hold it with one hand to secure it.
- Avoid pulling too hard. As they are connected with wires at the bottom which will break.
Step 5. Clean the Fan
Once the fan is removed safely from the ceiling, it needs to be clean—a time-consuming task. Here you will use a soft bristle brush or toothbrush works too and an air compressor.
Follow these few steps:
- Remove the motor from the downside of the unit. It will help you to clean properly.
- Clean the squirrel cage with a brush or air compressor for the internal part. After removing dry dust, use a damp cloth to wipe it down.
- Next, take out the main part and take off the middle-side nut. Then take off the cage from the motor.
- Dip the cage into the soapy water and scrub with a brush.
- You can use a microfiber cloth to clean the mesh. You can also use the vacuum with a brush with a low setting to clean.
Step 6. Remove Motor from the Ceiling
- Do not hesitate to clean the bathroom fan further. They are attached to the ceiling with a few screws.
- Before opening, the screws unplug the connecter or plug that connects the electricity.
- Use a screwdriver to remove the screws; remember to hold the fan with one hand when opening the last one.
Step 7. Clean the Motor
You can clean the motor without facing any difficulty and properly. As a result, there will be less damage. However, you need a magnetic screwdriver for better results.
- Loosen the screws and pull them out.
- Separate the motor and electronics from the mesh.
- Soak mesh in soapy water and scrub.
- After mesh cover, clean the motor and electronics area.
- Re-screw the mesh cover with motor and electronics and keep it aside; make sure to connect the wires properly.
Step 8. Clean the Fan Box
Go to the box where the fan is attached. You can use a vacuum cleaner or air compressor. You can also use the damp microfiber cloth.
Step 9. Reassemble the Fan
After cleaning the exhaust fan, it is time to put it back. Make sure you have connected the wires properly, then for the first step, you have to put it back in place and then replace the screws—Plugin the fan.
Make sure the fan is working smoothly. It is important to know if the air is right and there is no noise. Keep it on for a few minutes.
If everything is fine, then you put the cover back on by pinching the steel wire to secure the cover and gently pressing in the cover.
Benefits of Cleaning Bathroom Fan
Everything needs care so do the bathroom fans. Here are some benefits to keep you motivated when keeping your bathroom fan clean.
- If you clean your bathroom fan in a few days or two to three months, it will increase its lifespan. In addition, oiling reduces the noise coming from fans even after cleaning.
- Another main function of the exhaust fan is to eliminate the bad odor.
- Keep your bathroom environment dry to prevent mold.
- Vents out the humidity and steam out of your bathroom; it will keep the environment clean.
- Also, if you clean your bathroom fan every once, it will save you money. You do not have to buy a new one or hire someone to clean it thoroughly after a long while.
FAQs – Frequently Asked Questions
How Do I Open My Panasonic Exhaust Fan?
You have to squeeze the vent cover of your Panasonic exhaust fan. Now catch the metal mounting wires and slide them down with your exhaust fan housing from its root.
How Do I Clean My Panasonic Circulation Fan?
Use a softer brush to get rid of dust from the circulation fan. If you see tougher messes still on it, you can use a microfiber cloth and soapy water to scrub them out from the surface of your Panasonic circulation fan.
How Do You Clean the Inside of an Exhaust Fan?
The crevice attachment of any vacuum cleaner will help you to clean the inside of an exhaust fan. This gear will efficiently remove all the messes from fan housing and motor components.
How Do You Remove the Light Cover on a Panasonic Bathroom Fan?
You have to pull out the light cover of your Panasonic bathroom fan with care because there are two wires connected on each side of this cover which will pop up along with this cover.
How Do You Remove an Exhaust Fan Cover?
You will notice the metal pieces on both sides of your exhaust fan cover. You have to squeeze this cover from these metal strips with care.
Conclusion
It is important to keep the bathroom ventilated, as many harmful bacteria will form in humidity and moisture. In addition, mold will form, which is harmful and might cause various respiratory diseases.
So, it is suggested to clean your fan every two months to prevent diseases.
Moreover, we have guided you on how to clean your Panasonic bathroom fan. Cleaning the fan will save money and make you feel good that you are taking care of your home.


Leave a Reply