If you’re looking for ways to enhance the interior of your house by using inexpensive and cheap flooring ideas, then vinyl plank flooring is a great option to use. But most of us wonder how to cut vinyl plank flooring to get started on the installation. Besides installing expensive hardwood floors that also require frequent maintenance.
The option to install these vinyl plank flooring works as a great alternative. The difference between the hardwood floor tiles and the vinyl plank flooring is that vinyl plank flooring requires to be cut.
In a Hurry? Here’s How to Cut Vinyl Plank Flooring
- Use the scoring technique to determine the place of cut.
- Take the accurate measurement of plank cut and mark the cut line with a pencil or chalk.
- Stable the plank with your knee on its top while cutting.
- Place the framing square on the plank; use a utility knife to cut the plank accurately.
- Turn your vinyl plank over and use the dominant hand to snap it off. If it is still difficult, mark another cut deeper to snap it off again.
- For longer cuts, use the workbench to stabilize the plank and the jigsaw to remove smaller particles.
- Push the jigsaw gently, line up the plank’s cutting line to the blade, and force the plank for cutting.
Tools & Materials Required
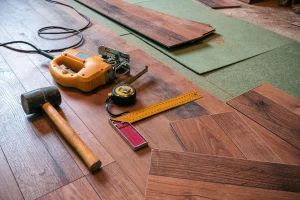
To cut the vinyl plank flooring, you require some specific tools in order to fit these planks accurately into the floor.
We will further be discussing the tools and the procedure on how to cut the vinyl plank flooring.
- Jigsaw
- Pencil or chalks
- Utility knife
- Clamps
- Safety goggles
- Framing squares
- Tape measures
- Circular saws
Steps to Cut the Vinyl Plank Flooring
Follow the following steps to cut the vinyl plank floors in no time. Do follow them in the order they are mentioned or you might end up ruining your new vinyl planks.
Determining the Kind of Cut You Need to Make
So, the first step is to determine, how you cut the vinyl plank flooring to begin the installation. To cut the vinyl planks shorter, you need to follow the scoring technique. The scoring technique works perfectly for this purpose.
This technique is mostly used to fit the plank at the end of the row. And can also be used to shorter the width of the planks as well. While to cut the longer-length planks, you will need a jigsaw for that.
Useful Tip
Try to map out the floors before starting to cut, as it will make it easier for you to avoid any damage while cutting.
Measuring and Marking the Cut
After cutting the plank, now it’s time to measure the exact spot by marking the cut line. For this process, you need to measure the accurate distance along the plank to mark.
You can use either pencil or chalk, whichever is available for this purpose. After this, you must position the framing square where you need the mark to be cut.
For this, you’ll need the horizontal side to be parallel with the side of the plank. Whereas the vertical side of the plank should be the one that must be in line with the pencil or chalk mark.
Now take the pencil or chalk to draw the link on the mark. Make sure to keep the line straight with the marked spot to give an accurate measurement.
An easier way to mark the position of the cut is also by placing your plank on the floor directly and drawing the line to the spot where the previous plank ends.
Score Your Cutline (For Shorter Cuts)
One thing to keep in mind here is that this method and technique are only used here for the shorter cuts.
To begin with the shortcuts, first, you need to keep the planks in a safe and stable position so that while cutting, the planks should not move as that will ruin the cut and make the cut uneven.
But there is one easy method to do so, that is by placing your knee on top of the plank to make it stable. To avoid damage while doing this step, it’s better to place a spare flooring piece underneath the plank.
Placing the Framing Square
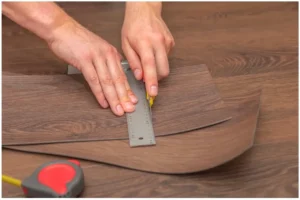
The next part here is to place the framing square on top of the plank. While the other edge or end of the plank should be placed through the cutting line to keep it in shape.
Now, place your right hand if you’re left-handed and similarly left hand if you’re right-handed on top of the frame to hold the plank in place.
After this, you should use the utility knife and move along the cutting line in order for the blade to run through it and cut the plank accurately.
For safety and accuracy, it’s best to keep the movement of the knife in a stable and firm manner and not hold the knife too tightly to avoid any mistakes.
Useful Tip
To keep your framing square at a firm and stable position, you can also use your thumbs and place them above and close to the cutting edge.
Snapping Off the Cuts
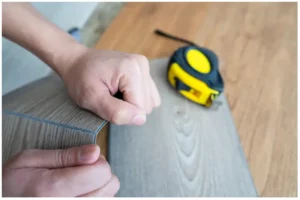
Now it’s time to snap off the cuts that are marked on the planks. To do so, you need to turn the planks over and weigh down the larger part of the section. You can use your knee for this as you place it on top of the plank.
In case you have placed the plank on the countertop or a workbench, then by using your non-dominant hand, you can bend on it from one side.
After placing your non-dominant hand, now use your dominant hand to tilt it and snap it off from the plank by pulling it towards you.
If you feel that the plank doesn’t easily snap off, avoid rushing and hurrying during this process. Because this could result in damaging the plank.
For this, simply turn the plank over again, take the utility knife and move it across the marked line again to cut it further a bit deep.
Now when you feel that the cut is deep enough, tilt the plank over again and use the same process to snap off the plank from the marked area.
Useful Tip
It’s better to keep the cut sections with yourself. It is so as they could help you fill in edges & ends of the plank to use for further rows.
Securing Your Planks for Cutting (For Longer Cuts)
Now begin the cutting procedure of the longer cuts. For that, you need to use the workbench or countertop and place the plank firmly on it.
After placing the plank safely onto the workbench, it’s time to use the clamp on the side of the plank to further keep the plank in a stable and firm position and make it easier to cut it along.
To cut the plank through, you will need to create some space beneath the plank so that the blade of the knife or saw you are using doesn’t damage the surface beneath and ruin the overall appearance.
Make sure that the clamps are placed appropriately on the plank and tightened accordingly. Using safety measures, like goggles and gloves to use the jigsaw, is a must at this step.
Because while using the jigsaw, it throws away the smaller particles in the air, and it could get into the eyes to cause severe damage.
Useful Tip
If you feel that you have enough practice to use the jigsaw freely, then you can avoid using the clamps by just placing the hand on the plank to cut it through.
Cut Along the Line with the Jigsaw
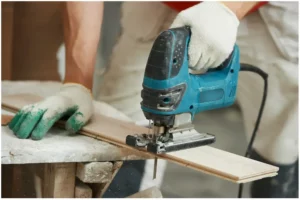
For this step, it’s best to place the jigsaw on the plank in an appropriate manner. The ideal way to use the jigsaw is to place it at the start of the cutting line, while the blades facing away from you.
So that when you start to cut, you move the jigsaw away from your body. Now, place both of your hands to trigger the jigsaw and start it.
The jigsaw will then simply allow the blades to move along the plank in an up and down manner.
While during this process, as the jigsaw is started, now you will just need to push it towards the direction of the plank to the line where you want to cut it.
The main part is to push the jigsaw gently and not rush during this procedure, as any wrong movement could simply be very risky and faulty.
Also, make sure to keep the blade lined up along with the cutting line and avoid applying any sort of pressure and force through the plank.
Video Guide on How to Cut Vinyl Plank Flooring
Cutting vinyl plank flooring may require some sort of demonstration to have a better idea of how to perform this task. To help you out, here’s a video for you.
Some Useful Tips to Keep in Mind
- If you don’t have a framing square, that’s not an issue; you can use the speed square and another carpenter square as well for this process.
- While using the jigsaw, if you feel that the edges are not properly trimmed, then you can use the knife to trim off the edges for a proper shape.
- You can use metal tape as well for the accurate measurement of the plank, and it could be a very useful tool for measurement.
- It will really help you if you use the folding ruler, as it will give the straight point edge to draw an accurate line.
- Make sure to keep your cutting lines straight and precise for an accurate measurement.
- To cut off the smaller plank pieces, you can use the pliers as well, as they are pretty helpful and handy tools for this purpose.
- Make sure to double-check the cutting lines and marked lines, as it will only help you further and make you confident in moving ahead.
FAQs – Frequently Asked Questions
Can You Cut Vinyl Flooring with A Utility Knife?
Yes, you can absolutely use the utility knife to cut the smaller parts and trim some edges of the vinyl plank flooring.
Can I Cut Vinyl Flooring with a Saw?
Yes, circular saws are best to cut off the longer parts of the vinyl plank flooring.
Do You Cut Vinyl Flooring Face up Or Down?
It is best recommended to cut the vinyl plank flooring by turning it back on the board. But you can also cut the planks facing up by using sharp jigsaw blades.
Will a Tile Cutter Cut Vinyl Planks?
A vinyl tile cutter can be used to cut the vinyl planks, but if you want to use the ceramic tile cutter, then it’s not the best option to use.
When Cutting Vinyl Which Side Goes Down?
While cutting the vinyl, make sure to keep the shinier side up while the vinyl side down, and you can also practice this beforehand to make sure you don’t repeat this during the cutting procedure.
Conclusion
As much as the vinyl plank flooring is helpful in increasing the aesthetics and enhancing the interior of the house.
It is as much important and inexpensive as the other hardwood tiles and can be used as the best modern alternates. Furthermore, there are numerous outdoor vinyl options to amp up the beauty of your home.
The cutting procedure of these vinyl plank flooring is not as complicated as it seems and can be performed without a hassle using no special or expensive tools.
Other than cutting, the removal process of vinyl floors after installation is also effortless. We hope that with the information provided in this article, you may now be able to cut your vinyl floors with ease and less effort.


Leave a Reply